Selasa, 16 Agustus 2011

  DISCLAIMER
This article is intended for IT Professionals and systems administrators with experience servicing computer hardware. It is not intended for home users, hackers, or computer thieves attempting to crack the password on a stolen PC. Please do not attempt any of these procedures if you are unfamiliar with computer hardware, and please use this information responsibly. LabMice.net is not responsible for the use or misuse of this material, including loss of data, damage to hardware, or personal injury. 

Thanks to i-hacked

pwdel.doc
HOW TO DELETE THE SYSTEM PASSWORD
on
TOSHIBA NOTEBOOK, DESKTOP, AND SERVER SYSTEMS
(􀁮)
(􀁯)
(􀁰)
(􀁱)
(➎)
Libretto 50, 70, 100, 110 Series 􀀹
Portégé 610, 620, 650, 660, 3010, 3020, 3110, 3140 Series 􀀹
Portégé 3440, 3480, 3490, 4000, 7000, 7010, 7020, 7140, 7200 Series 􀀹
Portégé 7200CTe, 7220CTe Series 􀀹
Satellite 100, 110, 200, 220, 300, 310, 320, 330, 1550, 1800 Series 􀀹
Satellite 1605, 1625, 1675, 1695, 1715, 1730, 1750, 3000 Series 􀀹
Satellite 2060, 2100, 2140, 2180, 2210, 2230, 2250, 2500, 2510 Series 􀀹
Satellite 2520, 2530, 2540, 2550, 2590, 2610, 2650, 2670, 2710 Series 􀀹
Satellite 2750, 2770, 2800, 4000, 4010, 4020, 4030, 4060, 4070 Series 􀀹
Satellite 4080, 4090, 4100, 5000 Series 􀀹
Satellite Pro 400, 410, 420, 430, 440, 460, 470, 480, 490 Series 􀀹
Satellite Pro 4220, 4260, 4270, 4280, 4290, 4310, 4320, 4330 Series 􀀹
Satellite Pro 4340, 4360, 4380, 4600, 6000 Series 􀀹
Tecra 500, 510, 520, 530, 540, 550, 700, 710, 720 Series 􀀹
Tecra 730, 730X, 740, 750, 780, 8000, 8100, 8200, 9000 Series 􀀹
T100, T200 Series 􀀹
T1800, T1850, T1900, T1910, T1950, T1960 Series 􀀹 􀀹
T2100, T2130, T2150, T2400, T2450 Series 􀀹
T3300 Series 􀀹
T3400, T3600 Series 􀀹
T4400 Series 􀀹
T6400 Series 􀀹
T4500, T4600, T4700, T4800, T4850, T4900 Series 􀀹
T6600 Series 􀀹
Equium Series 􀀹
Infinia Series 􀀹
Magnia, M500, M500D, M510D Server Series 􀀹
Toshiba V3100, 3200, V3300 Value-Priced Desktop Series 􀀹
NOTES:
(􀁮) Use the parallel port wraparound connector (P/N: TTW-9100)􀁄 on the printer port. Libretto series, Portege 3xx, 3xxx, 4xxx,
7xxx series, and Satellite 5xxx series do NOT have an integrated parallel port. An I/O bar (ships with system, except for
Portege 4xxx) or an enhanced port replicator (sold separately) is required to provide the parallel port on the Libretto and
Portege series. Printer PC Card (P000293630) and PC Card Cable (P000293640) are required to provide the parallel port on
the Satellite 5xxx series.
(􀁯) Disconnect all power sources (i.e. AC adapter or AC power cord and all batteries: Main, RTC, Backup)
(􀁰) Password deletion software is required. Ship computer to Toshiba Manufacturing Repair Center (MRC) or Premier ASP
(􀁱) Reset via jumper setting on motherboard. See maintenance manual for location and setting.
(➎) Reset via shorting jumper pad (J1 - Satellite 16xx and 3xxx series/J9 - Satellite 17xx series) on the system board for five seconds
minimum with system powered off and main battery/AC adapter disconnected. Jumper pad is located under the memory cover. The
expansion memory must be removed for access to the jumper pad. This procedure will also reset CMOS.
(􀁄) This part number includes both parallel and serial port connectors. If the unit is not listed above, then the system password security
feature is not available.
Before attempting to bypass the BIOS password on a computer, please take a minute to contact the hardware manufacturer support staff directly and ask for their recommended methods of bypassing the BIOS security. In the event the manufacturer cannot (or will not) help you, there are a number of methods that can be used to bypass or reset the BIOS password yourself. They include:
  • Using a manufacturers backdoor password to access the BIOS
  • Use password cracking software
  • Reset the CMOS using the jumpers or solder beads.
  • Removing the CMOS battery for at least 10 minutes
  • Overloading the keyboard buffer
  • Using a professional service
Please remember that most BIOS passwords do not protect the hard drive, so if you need to recover the data, simply remove the hard drive and install it in an identical system, or configure it as a slave drive in an existing system. The exception to this are laptops, especially IBM Thinkpads, which silently lock the hard drive if the supervisor password is enabled. If the supervisor password is reset without resetting the and hard drive as well, you will be unable to access the data on the drive.

Backdoor passwords
Many BIOS manufacturers have provided backdoor passwords that can be used to access the BIOS setup in the event you have lost your password. These passwords are case sensitive, so you may wish to try a variety of combinations. Keep in mind that the key associated to "_" in the US keyboard corresponds to "?" in some European keyboards. Laptops typically have better BIOS security than desktop systems, and we are not aware of any backdoor passwords that will work with name brand laptops.
WARNING: Some BIOS configurations will lock you out of the system completely if you type in an incorrect password more than 3 times. Read your manufacturers documentation for the BIOS setting before you begin typing in passwords


Award BIOS backdoor passwords:  
ALFAROME
ALLy
aLLy
aLLY
ALLY
aPAf
_award
AWARD_SW
AWARD?SW
AWARD SW
AWARD PW
AWKWARD
awkward
BIOSTAR
CONCAT
CONDO
Condo
d8on
djonet
HLT
J64
J256
J262
j332
j322
KDD
Lkwpeter
LKWPETER
PINT
pint
SER
SKY_FOX
SYXZ
syxz
shift + syxz
TTPTHA
ZAAADA
ZBAAACA
ZJAAADC
01322222
589589
589721
595595
598598
AMI BIOS backdoor passwords:
AMI
AAAMMMIII
BIOS
PASSWORD
HEWITT RAND
AMI?SW
AMI_SW
LKWPETER
A.M.I.
CONDO
PHOENIX BIOS backdoor passwords:
phoenix, PHOENIX, CMOS, BIOS
MISC. COMMON PASSWORDS
ALFAROME
BIOSTAR
biostar
biosstar
CMOS
cmos
LKWPETER
lkwpeter
setup
SETUP
Syxz
Wodj
OTHER BIOS PASSWORDS BY MANUFACTURER
Manufacturer Password
VOBIS & IBM merlin
Dell Dell
Biostar Biostar
Compaq Compaq
Enox xo11nE
Epox central
Freetech Posterie
IWill iwill
Jetway spooml
Packard Bell bell9
QDI QDI
Siemens SKY_FOX
TMC BIGO
Toshiba Toshiba
TOSHIBA BIOS
Most Toshiba laptops and some desktop systems will bypass the BIOS password if the left shift key is held down during boot
IBM APTIVA BIOS
Press both mouse buttons repeatedly during the boot
If all else fails, check out the default passords list.
 

Password cracking software
The following software can be used to either crack or reset the BIOS on many chipsets. If your PC is locked with a BIOS administrator password that will not allow access to the floppy drive, these utilities may not work. Also, since these utilities do not come from the manufacturer, use them cautiously and at your own risk.

Using the Motherboard "Clear CMOS" Jumper or Dipswitch settings
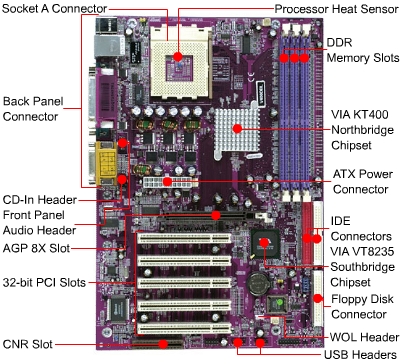
Many motherboards feature a set of jumpers or dipswitches that will clear the CMOS and wipe all of the custom settings including BIOS passwords. The locations of these jumpers / dipswitches will vary depending on the motherboard manufacturer and ideally you should always refer to the motherboard or computer manufacturers documentation. If the documentation is unavailable, the jumpers/dipswitches can sometimes be found along the edge of the motherboard, next to the CMOS battery, or near the processor. Some manufacturers may label the jumper / dipswitch  CLEAR - CLEAR CMOS - CLR - CLRPWD - PASSWD - PASSWORD - PWD. On laptop computers, the dipswitches are usually found under the keyboard or within a compartment at the bottom of the laptop.  Please remember to unplug your PC and use a grounding strip before reaching into your PC and touching the motherboard. Once you locate and rest the jumper switches,  turn the computer on and check if the password has been cleared. If it has, turn the computer off and return the jumpers or dipswitches to its original position.

Removing the CMOS Battery
The CMOS settings on most systems are buffered by a small battery that is attached to the motherboard. (It looks like a small watch battery). If you unplug the PC and remove the battery for 10-15 minutes, the CMOS may reset itself and the password should be blank. (Along with any other machine specific settings, so be sure you are familiar with manually reconfiguring the BIOS settings before you do this.) Some manufacturers backup the power to the CMOS chipset by using a capacitor, so if your first attempt fails, leave the battery out (with the system unplugged) for at least 24 hours. Some batteries are actually soldered onto the motherboard making this task more difficult. Unsoldering the battery incorrectly may damage your motherboard and other components, so please don't attempt this if you are inexperienced. Another option may be to remove the CMOS chip from the motherboard for a period of time.  Note: Removing the battery to reset the CMOS will not work for all PC's, and almost all of the newer laptops store their BIOS passwords in a manner which does not require continuous power, so removing the CMOS battery may not work at all.  IBM Thinkpad laptops lock the hard drive as well as the BIOS when the supervisor password is set. If you reset the BIOS password, but cannot reset the hard drive password, you may not be able to access the drive and it will remain locked, even if you place it in a new laptop. IBM Thinkpads have special jumper switches on the motherboard, and these should be used to reset the system.

Overloading the KeyBoard Buffer
On some older computer systems, you can force the CMOS to enter its setup screen on boot by overloading the keyboard buffer. This can be done by booting with the keyboard or mouse unattached to the systems, or on some systems by hitting the ESC key over 100 times in rapid succession.

Jumping the Solder Beads on the CMOS
It is also possible to reset the CMOS by connecting or "jumping" specific solder beads on the chipset. There are too many chipsets to do a breakdown of which points to jump on individual chipsets, and the location of these solder beads can vary by manufacturer, so please check your computer and motherboard documentation for details. This technique is not recommended for the inexperienced and should be only be used as a "last ditch" effort.

Using a professional service
If the manufacturer of the laptop or desktop PC can't or won't reset the BIOS password, you still have the option of using a professional service. Password Crackers, Inc., offers a variety of services for desktop and laptop computers for between $100 and $400. For most of these services, you'll need to provide some type of legitimate proof of ownership. This may be difficult if you've acquired the computer second hand or from an online auction.

Links to Motherboard Manufacturers
If you need additional documentation about your motherboard, location of jumpers / dipswitches, location of the battery, BIOS settings, etc., we've included links to most of the major motherboard manufacturers here.
2 the Max
A-trend

Abit

American Megatrends

Amptron

Aopen

ASUS

Biostar
Chaintech
Concord
Elite Computer Systems

Epox

FIC

Freetech

Giga-Byte
IBM
Intel
Magic-Pro
Matsonic

Microstar
PC Chips

QDI

Siemens

SuperMicro
Tyan

Minggu, 14 Agustus 2011

Cari Artikel : Home All Download Software Tips & Trick Hardware Antivirus Security Google Delphi FORUM Random tags: Driver vista chm foxit reader partisi backup UBCD4Win Tips Shollu MP4 avira-indonesia Yuk, gabung dengan Forum ebsoft, ajang berbagi dan diskusi berbagai informasi tentang teknologi Komputer & Internet, tips trik, pemrograman, dan lainnya Tips Mengubah Ukuran kertas Microsoft Word 2010, 2007 dan 2003

THANKS TO  ebsoft.web.id
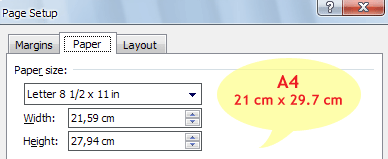
Jika kita menggunakan Microsoft Word 2010, 2007 ataupun Word 2003, biasanya ketika membuat dokumen baru, ukuran kertasnya adalah Letter ( 8.5 x 11 inchi atau 21.59 cm x 27,94 cm). Padahal di Indonesia, jarang yang menggunakan ukuran ini, tetapi sebagian besar menggunakan ukuran A4 (21 cm x 29,7 cm).
Meskipun kita bisa mengubahnya ke A4 dengan mudah, tetapi agar memudahkan maka ada baiknya jika kita set setting bawaannya agar menjadi A4.

Ukuran kertas bawaan Microsoft office ( bahasa Inggris – US ) adalah Letter memang bisa dipahami, karena sepertinya di Amerika (US) ukuran kertas inilah yang paling sering di gunakan.
Karena ukuran bawaan (default) adalah letter, tidak jarang ada yang lupa mengubahnya menjadi A4 ketika mencetak, sehingga di bagian bawah, terlihat jarak kosong yang lebih lebar. Ukuran Letter lebih pendek sekitar 1.7 cm dibanding dengan A4.

Berikut tips mudah untuk mengubah ukuran bawaan (default) menjadi A4 ketika membuat halaman baru Office 2010, 2007 ataupun 2003 ( mungkin juga Office XP – belum sempat mengecek untuk Office Xp).
  1. Buka Microsoft Word
  2. Klik Icon Open (File > Open)
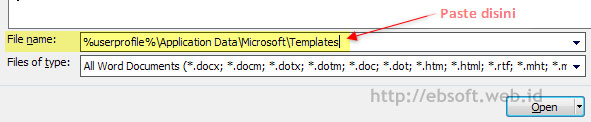
  3. Copy text ini : %userprofile%\Application Data\Microsoft\Templates, kemudian paste di bagian file name. Kemudian klik Open (lihat gambar berikut untuk lebih jelasnya).
  4. Untuk Word 2003 buka file Normal.dot, untuk word 2007 atau 2010 buka file Normal.dotm
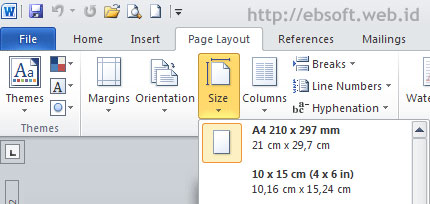
  5. Setelah terbuka halaman kosong (normat.dot atau normal.dotm), atur ukuran kertas menjadi A4. Untuk Word 2003 melalui File > Page Setup, sedangkan Word 2007 dan 2010 melalui tab Page Layout.
  6. Setelah itu simpan dengan klik Save dan tutup Word
Setelah melakukan langkah diatas, seharusnya setiap kita membuat halaman baru, ukuran kertas menjadi A4. Jika kita ingin mengatur agar ukuran kertas bawaan menjadi Folio ( 21.5cm x 33cm), ikuti langkah seperti diatas dan pada langkah ke-5 ubah Pilih ukuran kertas Custom dan buat menjadi 21.5 cm dan 33 cm.

Bagi para ‘pemula’ seringkali terjadi kesalahan dalam pengukuran film, sehingga berdampak pada saat persiapan percetakan. Ini berawal dari kesalahan pembuatan ukuran desain, misalnya desain di CorelDraw. Bagi yang baru memakai aplikasi ini terkadang karena ketidaktahuan tidak memperhatikan tampilan 100% desain yang telah dibuat. Kesalahan ini mengakibatkan ukuran film tidak sesuai (misalnya ukurannya terlalu besar atau terlalu kecil) maka mesin cetak yang dipakaipun akan lain. Dampak lain adalah pada jumlah cetak untuk satu plano. Misalnya, seharusnya perkiraan dalam 1 plano akan dibuat 12 buah cetak, karena salah perhitungan yang terjadi adalah kurang dari jumlah seharusnya, dan banyak lagi dampak lain yang berujung pada pembengkakan biaya produksi. Berikut ini kami sampaikan tabel ukuran kertas, area cetak dan masing-masing mesin yang dipakai (dalam satuan centimeter):
  1. Mesin: GTO46 (38.1x 35.71), Ukuran kertas: 32 x 46, Area Cetak: 31 x 45
  2. Mesin: GTO52 (40 x 51), Ukuran kertas: 36 x 52, Area Cetak: 34 x 50
  3. Mesin: SOR M (61.5 x 72.4), Ukuran kertas: 52 x 74, Area Cetak: 51 x 72
  4. Mesin: SOR D (71.5 x 91.5), Ukuran kertas: 71.5 x 91.5, Area Cetak: 70 x 90
  5. Mesin: SOR S (77 x 103), Ukuran kertas: 70 x 100, Area Cetak: 69 x 98
  6. Mesin: OLIVER58 (51 x 57), Ukuran kertas: 44 x 58, Area Cetak: 42 x 56
  7. Mesin: OLIVER52, Ukuran kertas: 36 x 52, Area Cetak: 34 x 50
  8. Mesin: OLIVER46, Ukuran kertas: 33 x 48, Area Cetak: 32 x 47
  9. Mesin: OLIVER72, Ukuran kertas: 50 x 70, Area Cetak: 48 x 68
Sebagai panduan, 1 plano berukuran 79x109cm = 8611.
Contoh; ukuran film 35x30cm, akan dibuat 500cetak. Maka jumlah kertas yang diperlukan adalah: 8611/(35*30) = 8611/1120 = 8.2. Artinya 1 plano akan terbentuk sebanyak 8 buah cetak. Sehingga apabila diperlukan 500 cetak, maka diperlukan kertas sebanyak 500/8.2 = 60.9 atau 61plano. (aliya)

Mengatur Ukuran Kertas di Printer

Menurut adigunaPernahkan anda ngeprint pada kertas dengan ukuran lebih panjang dari biasanya, atau bingung bagaimana caranya mengaturnya ? apaka bisa ngeprint dengan ukuran kertas panjang diatas 200 cm ? jawabannya bisa kok…
Kadang – kadang kita juga bingung ingin ngeprint dg ukuran kertas yg sudah ada, misalnya ukuran kertas 15 cm x 28 cm, atau 16,5 cm x 33. Sedangkan ukuran default di menu printernya tidak sediakan.
Ikuti caranya dibawah ini : –> untuk sementara saya menggunakan printer EPSON type apapun karena fungsi menunya hampir sama.
  • Klik Start Program –> Printers and Faxes. lalu pilih type printernya misalnya Epson type C90 atau type yg lain sesuai dengan kondisi yg anda punya.
  • Klik kanan pada type printernya tadi lalu pilih printing preferences …
printer
  • Arahkan pada posisi Size lalu pilih User Define dan isikan namanya misalnya Kertas label, kertas undangan, CD label, Cover dll.
  • userdefind
  • Kemudian pilih dan centang Unit cm lalu isikan Paper Width dan Paper Height, aturan pengisian harus ditambahin 2 bilangan nol dibelakangnya misalnya ukuran paper width 15 cm berarti diisi 1500, 21 cm diisi 2100, atau 29,7 cm diisi 2970 dan seterusnya. Klik ok.. maka Ukuran PaperSize sudah anda buat.
  • Kembali pada pekerjaan file yang akan di print. Tekan Ctrl P, atau File > Print. lalu pilih Sizenya yg sudah kita buat tadi dan atur quality optionnya dg selera anda.
Ok…. sekarang anda menjadi semakin pede dan pintar tentunya… hehe…
Sebarkan dan kirimkan tips-tips ini ke teman anda atau berlangganan via email disini

Cara Install Windows XP dengan Flashdisk

Cara Install Windows XP dengan Flashdisk

THANKS TO SPECIAL
ndroe.web.id Ceria Hosting,udinmduro.com/,sukrawan.com,aaheroe.info
Cara menginstall windows xp menggunakan media flasdisk untuk netbook.
usb Cara Install Windows XP dengan FlashdiskAkhir-akhir ini banyak sekali orang memilih jenis Komputer Netbook untuk dipakai sehari-hari karena harganya yang murah dan juga bentuknya yang kecil praktis dibawa kemana-mana. kelemahannya Netbook ini tidak dilengkapi dengan Cd room tau pun DVD room sehingga ketika kita ingin menginstall ulang windows karena rusak akibat virus sangat sulit kecuali mempunyai CD/DVD room externall. Tapi hal ini bisa diatasi dengan adanya teknologi Flasdisk yang semakin hari semakin besar kapasitasnya sehingga kita bisa menggunakan media Flasdisk ini sebagai pengganti CD room . DVD room.
Teknik yang yang saya gunakan ini tidak hanya berguna untuk netbook saja tapi berguna untuk semua komputer yang tidak memiliki cdroom dan sudah support booting dengan Usb Flasdisk.
Alat-alat yang harus di persiapkan :

  1. Usb Flash disk apa aja ( Min 1GB lebih besar lebih bagus).
  2. komputer master , lengkap dengan cd-rom ( untuk membuat master flash disk )
  3. CD installer windows xp.
Software yang diperlukan :
  • USB_PREP8 dan PEtoUSB  ( Sudah saya gabungkan jadi satu)
  • Silakhan di download terlebih dahulu file nya
    winzip Cara Install Windows XP dengan Flashdisk download: USB_PREP8 dan PEtoUSB ()
    added: 12/07/2010
    clicks: 38442
    description: USB_PREP8 dan PEtoUSB
Setelah alat yang diperlukan siap dan software telah didownload langkah berikutnya adalah :
  1. Colokan USB flash disk ke komputer.
  2. Masukan Cd Installer Windows Xp ke dalam CD room.
  3. Extrak file yang sudah di download ke Drive C:/flasdisk
  4. Selanjutnya masuk ke folder C:\flasdisk tadi yang sudah dibuat dan berisi file2 yang di extra diatas.
  5. Selanjutnya jalankan file bernama “usb_prep8.cmd” Kemudian akan muncul sebuah windows command prompt berisi bermacam2 perintah tekan sembarang tombol saja untuk melanjutkan.
  6. Kemudian akan muncul program PEtoUSB untuk memformat Flasdisk , Pilih flasdisk yang akan di format kemudian Klik Start sampai selesai.
  7. Jika proses format sudah selesai, tutup program PEtoUSB Kembali lagi ke windows command prompt usb_prep8.bat di layar akan muncul opsi-opsi dari 0 hingga 5.
  8. Selanjutnya pilih Pilihan No 1 untuk memilih sumber file installasi windows pilih Cdroom tempat kita menyimpan CD Installasi Windows xp.
  9. Setelah itu lanjutkan dengan Memilih Pilihan No 3 , untuk mentukan dimana kita mencolokan Usb flash disk , kalau di drive E maka ketik e dan tekan enter.
  10. Setelah tahap ini pilihlah Pilihan No 4 untuk memulai proses pembuatan modul instalasi yang nantinya akan disalin ke dalam USB flash disk secara otomatis. Ketika muncul Popup windows Pilih aja pilihan YES, apa pun konfirmasi yang muncul pilih YESn. Proses ini kira-kira akan memakan waktu sekitar 15 Menit.
  11. Setelah selesai semua langkah diatas dan Usb Flasdisk siap digunakan untuk Installasi Windows XP,
  12. Jangan Lupa ketika mau menginstall dengan Usb Flasdisk ini kita harus masuk dulu ke dalam BIOS komputer dan memilih boot First nya ke Removable drive.

Membuat Cd instalan windows(Bootable) Instan Dengan Nlite

Artikel ini ditujukan buat kamu yang tidak terlalu mengerti bagaimana membuat sebuah cd instalan windows (bootablee) . Biasanya hal ini saya lalukan untuk membackup cd windows yang sudah ada, takutnya hilang rusak atau gak bisa kebaca lagi karena mungkin sangat sering dipakai.
Sebenernya membuat cd instalan windows (bootable) sangat mudah, terima kasih untuk pembuat program Nlite. Dengan program ini kita dapat membuat sebuah cd master windows dengan cepat, tidak hanya itu program ini menawarkan juga berbagai macam fitur menarik lainya seperti Driver Integration , dimana kita bisa memasukan driver tertentu kedalam master windows yang akan kita buat sehingga akan otomatis terinstall di windows kita.
tahap pembuatan cd instalan windows:

1.download ntlite disini , program ini membutuhkan .NET Framework 2.0 .
2. Setelah didownload, install di komputer kamu lalu jalankan Nlite:
pilih lokasi folder tempat files instalan windows ( setelah di copy dr cd master windows )

2.Selanjutnya tinggal next, lalu tekan Bootable ISO

3.Selanjutnya next lalu pilih direct burn ( jangan lupa masukan cd blank ke cd rom kamu ) , pilih kecepatan speed paling rendah, centang verify lalu tekan burn untuk memulai proses pembakaran cd.

    Sabtu, 13 Agustus 2011

    http://members.ozemail.com.au/~bobpar/2003esrchart.txt

    Approx worst (highest) ESR readings for new capacitors
    
                    10V     16V     25V     35V     63V    160V    250V
                  _______________________________________________________
                 |       |       |       |       |       |       |       |
             1uF |  xxx  |  xxx  |   5   |   4   |   6   |  10   |  20   |
                 |_______|_______|_______|_______|_______|_______|_______|
                 |       |       |       |       |       |       |       |
           2.2uF |  xxx  |  xxx  |  2.5  |   3   |   4   |   9   |  14   |
                 |_______|_______|_______|_______|_______|_______|_______|
                 |       |       |       |       |       |       |       |
           4.7uF |  xxx  |  xxx  |   6   |   3   |   2   |   6   |   5   |
                 |_______|_______|_______|_______|_______|_______|_______|
                 |       |       |       |       |       |       |       |
            10uF |  xxx  |  1.6  |  1.5  |  1.7  |   2   |   3   |   6   |
                 |_______|_______|_______|_______|_______|_______|_______|
                 |       |       |       |       |       |       |       |
            22uF |   3   |  0.8  |   2   |   1   |  0.8  |  1.6  |   3   |
                 |_______|_______|_______|_______|_______|_______|_______|
                 |       |       |       |       |       |       |       |
            47uF |   1   |   2   |   1   |   1   |  0.6  |   1   |   2   |
                 |_______|_______|_______|_______|_______|_______|_______|
                 |       |       |       |       |       |       |       |
           100uF |  0.6  |  0.9  |  0.5  |  0.5  |  0.3  |  0.5  |   1   |
                 |_______|_______|_______|_______|_______|_______|_______|
                 |       |       |       |       |       |       |       |
           220uF |  0.3  |  0.4  |  0.4  |  0.2  |  0.15 | 0.25  |  0.5  |
                 |_______|_______|_______|_______|_______|_______|_______|
                 |       |       |       |       |       |       |       |
           470uF |  0.15 |  0.2  | 0.25  |  0.1  |  0.1  |  0.2  |  0.3  |
                 |_______|_______|_______|_______|_______|_______|_______|
                 |       |       |       |       |       |       |       |
         1,000uF |  0.1  |  0.1  |  0.1  |  0.04 |  0.04 |  0.15 |  xxx  |
                 |_______|_______|_______|_______|_______|_______|_______|
                 |       |       |       |       |       |       |       |
         4,700uF |  0.06 |  0.05 |  0.05 |  0.05 |  0.05 |  xxx  |  xxx  |
                 |_______|_______|_______|_______|_______|_______|_______|
                 |       |       |       |       |       |       |       |
        10,000uF |  0.04 |  0.03 |  0.03 |  0.03 |  xxx  |  xxx  |  xxx  |
                 |_______|_______|_______|_______|_______|_______|_______|
    satuan ukur dengan etsr 
     

    Completed The LCD Monitor Repairing Course

    Pemutar Video YouTube HTML5

    Pemutar Video YouTube HTML5

    Anda sedang menguji coba video HTML5 pada YouTube. Beberapa pengguna dengan peramban yang didukung masuk ke uji coba secara otomatis. Jika ingin meninggalkan uji coba, gunakan tautan di bagian bawah. HTML5 adalah teknologi peramban baru yang memungkinkan kita menampilkan video tanpa pengaya Flash.


    Peramban yang Didukung

    Kami mendukung peramban yang mendukung tag video dalam HTML5 dan format codec video h.264 atau WebM (dengan codec VP8). Di antaranya:


    Catatan

    • Dukungan layar penuh diterapkan sebagian. Menekan tombol layar penuh akan meluaskan pemutar hingga mengisi peramban. Jika peramban Anda mendukung opsi layar penuh, maka Anda dapat menggunakannya untuk benar-benar memenuhi layar
    • Jika ingin mencari video dengan format WebM, Anda dapat menggunakan opsi Penelusuran Lanjutan untuk mencarinya (atau cukup tambahkan &webm=1 pada URL penelusuran mana pun)


    Pembatasan Tambahan (sedang kami tangani!)

    • Video dengan iklan tidak didukung (video ini akan diputar di pemutar Flash)
    • Pada Firefox dan Opera, hanya video dengan transkode WebM yang akan diputar di HTML5
    • Jika Anda ikut serta dengan eksperimen testtube lainnya, Anda mungkin tidak akan mendapatkan pemutar HTML5 (namun, Feather didukung)

    Troubleshooting Motherboard, CPU and RAM - From Computer Repair with Diagnostic Flowcharts

    How-to Crack a BIOS Password - BIOS and CHIP cracking

    http://www.youtube.com/watch?v=5U5WdaCO6Qk&feature=player_embedded


    SMD Spare Parts

    SMD Spare Parts

     electronic spare part

    Yesterday my sister asked me whether i need the used hard disk or not. She said if i don’t want it she will throw it away. I quickly replied, yes of course i need it because i could salvage some SMD electronic parts from the board. Besides getting the SMD parts from the hard disk, i could also get this hard disk for my future students/participants to practice on how to solder/desolder SMD components especially the IC’s. I also buy over those bad computer motherboards (with cheap price) from my computer dealers in order to salvage the parts too.
    Although i don’t use the parts everyday but if you really need SMD component for a particular circuit in electronic equipment then this is the time where you can get some spare (hopefully) and reference too.

    Doubt About Using ESR Meter

    Jika Anda telah menggunakan meter kapasitansi yang normal analog dan digital untuk memeriksa kapasitor elektrolitik, lalu tiba-tiba beralih ke ESR meter, saya yakin Anda mungkin memiliki keraguan tentang keakuratan dari meteran untuk menemukan topi buruk. Aku sudah dalam situasi itu sebelum apakah itu akurat dalam memeriksa e-topi menggunakan ESR meter. Saya bisa meyakinkan Anda bahwa ketika Anda memiliki meteran menggunakan ESR untuk kadang-kadang dan tanpa itu Anda mungkin tidak ingin melakukan pekerjaan perbaikan. Kenapa? karena Anda telah begitu terbiasa untuk menemukan topi buruk menggunakan ESR meter ini cepat dan menghemat waktu mengatasi masalah Anda.
    Itu berarti Anda tidak akan lagi menggunakan metode konvensional untuk menguji e-topi yang tidak hanya akurat dan juga membuang-buang waktu solder keluar e-topi dan mengujinya dengan kapasitansi meter analog atau digital. Dalam rangka untuk membuat diri Anda memiliki percaya diri dalam pengujian e-topi dengan ESR meter, saya sarankan Anda mengambil semua topi buruk bahwa Anda telah disusun dalam lokakarya Anda (untuk tujuan pembuangan) dan menganalisis hasilnya. Bandingkan hasilnya bila Anda menguji topi buruk dengan analog / digital kapasitansi meter / ESR meter.
    Sekarang seperti yang kita semua tahu bahwa tidak ada alat uji 100% sempurna di pasar. Jika Anda menduga bahwa bagian tertentu memiliki masalah mengatakan bagian horizontal dan Anda tidak dapat menemukan komponen yang buruk, cara terbaik adalah untuk mengarahkan mengganti komponen di bagian. Siapa tahu mungkin ada komponen yang rusak ketika di bawah beban penuh dan komponen yang dapat E-topi atau komponen lainnya.
    By the way jika Anda memiliki salah ESR meter dan Anda perlu untuk referensi grafik untuk melihat apakah topi yang baik, buruk atau marjinal maka saya sarankan agar Anda mencetak grafik ini dari LINK ini.

    http://members.ozemail.com.au/~bobpar/2003esrchart.txt

    Motherboard Repair

    Aku sudah berhenti memperbaiki motherboard PC sejak saya meninggalkan komputer saya mantan perusahaan distributor kembali pada tahun 1994. Hari-hari papan motherboard terkenal adalah 486DX, 486sx dan Pentium. Saya diberikan dengan setiap model diagram skematik motherboard, chipset (semua kisaran IC), alat pematrian SMD, catatan masalah dan bahkan kartu diagnostik POST. Perbaikan motherboard PC pada masa itu cukup mudah tetapi saya ragu sekarang ini akan mudah kecuali jika Anda bekerja di produsen motherboard atau Anda memiliki sumber untuk semua jenis informasi yang berhubungan dengan motherboard.
    Kadang-kadang saya lakukan memiliki motherboard dikirim untuk diperbaiki oleh teman saya yang berurusan dengan menjual sistem komputer. Sebagian besar waktu itu adalah kapasitor elektrolitik menonjol dan cukup sederhana untuk memperbaikinya. Saat ini motherboard PC cukup murah dan orang-orang kurang ingin memperbaiki dan lebih memilih untuk membeli sebuah papan baru kecuali jika motherboard di kisaran yang lebih tinggi (bermerek). Seperti disebutkan, jika Anda tidak dapat sumber untuk bagian-bagian itu akan sangat sulit untuk memperbaiki papan. Hari-hari papan hanya menggunakan yang normal SMD IC (IC laba-laba) tetapi sebagian besar motherboard sekarang menggunakan IC BGA itu yang sangat sulit untuk mengekstrak kecuali Anda memiliki peralatan khusus untuk melakukan pekerjaan.
    Ini akan sangat memakan waktu untuk melakukan pekerjaan presisi kecuali keuntungan yang akan membuat Anda bisa menutupi biaya Anda jika tidak maka tidak akan ekonomis untuk memperbaiki motherboard. Jika salah satu pembaca di motherboard perbaikan blog saya saya ingin mendengarkan apa yang Anda katakan tentang motherboard memperbaiki bisnis nya kurang menguntungkan lagi

    Thanks to Master

    jestineyong

    Aku punya posting blog yang baik dengan Ranotosh pada perbaikan motherboard komputer. Berikut adalah tips:

    Pertama-tama terima kasih untuk website Anda, sangat berguna untuk orang-orang yang di bidang elektronik. Saya seorang hobbiest elektronik dari Kolkata (India). Saya ingin berbagi pengalaman saya di motherboard memperbaiki dengan pembaca blog Anda.

    1. Periksa kerusakan fisik yaitu papan terbakar habis bagian, meningkat (menonjol) kapasitor elektrolitik, trek rusak, terbakar keluar slot ram, chip retak dll

    2.In banyak kasus SMP berhenti dalam beberapa detik setelah power on, ini adalah indikasi dari sebuah sirkuit pendek di motherboard. Dalam kebanyakan kasus FET dalam rangkaian regulasi tegangan mendapatkan shorted.one dapat memeriksa dengan multimeter untuk setiap FET korsleting. Kadang-kadang chip bisa mendapatkan korsleting, dalam satu kasus harus tegas kekuasaan di SMP oleh shorting kabel hijau dan hitam dari SMP dan mencari apapun chip terlalu panas.

    3. Ganti bios dari motherboard serupa.

    Ini adalah beberapa teknik dasar perbaikan tingkat chip motherboard.

    WOUXUN KG-UVD1P VHF / UHF Dual Band Handheld Transceiver

    http://n9ewo.angelfire.com/kguvd1p.html
    WOUXUN KG-UVD1P
    VHF / UHF Dual Band Handheld Transceiver
    Many "low cost" Chinese VHF and UHF handheld transceivers can be found these days around the internet.
    The quality and performance are on the bottom end of the scale for the most part.
    However , the "Dual Band" Wouxun KG-UVD1P pars better for "Amateur Radio" use, but it's no where near perfect either.
    I have provided an easy to understand "menu" chart on the bottom of this page.
    NOTE : Also sold as the (relabeled)
    Midland CT790, Dynascan DB-48 , Albrecht DB-270, Team TeCom DB and Navcomm TK-890.
    Two similar variants : The KG-UV2D and KG-UV3D (see text below).
    (Photo : N9EWO)

    Country of Origin, all pieces: (PRC) Chinahttp://www.surfgadget.com/high-power-wifi-adapter.html?page=shop.product_details&category_id=161&flypage=flypage.tpl&product_id=1357

    Apa bedanya WinZip, WinRar, sama 7-Zip sih ?

    Win Zip Versi 14
    Di design khusus di Windows 7 sebagai file kompressor andalan. Pada Win 7 bahkan sudah ditambahkan beberapa fitur baru lainnya, bahkan sudah mendapat dukungan luas untuk perpustakaan, peralatan, dan arsip. WinZip 14 Ini memiliki kompresi yang lebih baik untuk file JPEG. Zip dari Kamera, dan konteks mendukung menu yang mendalam memungkinkan Anda untuk melakukan sebagian besar fungsi WinZip.

    7-Zip

    7-Zip arsip utilitas dikembangkan sebagai proyek open source oleh Igor Pavlov. 7Zip bebas untuk digunaka di rumah atau untuk penggunaan komersial. 7zip berjalan pada Windows dan mencakup antarmuka GUI dan antarmuka baris perintah. 7-Zip adalah pemenang untuk kecepatan superior, dukungan untuk format arsip ganda dan fitur-fiturnya.

    WinRAR

    WinRAR adalah sebuah utilitas pengarsipan yang sepenuhnya mendukung RAR dan ZIP arsip dan mampu membongkar CAB, ARJ, LZH, TAR, GZ, ACE, uue, bz2, JAR, ISO, 7z, Z arsip. Ini konsisten membuat arsip lebih kecil dibandingkan dengan kompetisi, menghemat ruang disk dan biaya transmisi.

    WinRAR menawarkan antarmuka grafis interaktif menggunakan mouse dan menu serta antarmuka baris perintah. WinRAR lebih mudah digunakan daripada archivers lain dengan dimasukkannya mode khusus "Wizard" yang memungkinkan akses cepat ke fungsi pengarsipan dasar melalui pertanyaan sederhana dan prosedur jawaban.

    Jadi manakah software kompresi yang terbaik?
    Kita tidak bisa menjawab pertanyaan ini. Sebagai perbandingan menunjukkan kecepatan kompresi WinZip adalah lebih besar dari WinRar & 7-Zip. Tapi 7-Zip dan WinRar dapat meng-kompresi file lebih baik daripada WinZip. Untuk yang gratisan 7-zip adalah pilihan yang lebih baik meskipun dengan antarmuka yang buruk sekalipun. http://id.answers.yahoo.com/question/index?qid=20110707011538AA1GkYR

    Bagi yang mau download, ni link downloadnya :

    Bagi yang mau download, ni link downloadnya : 
    Download IDM 6.03 + Patch / Serial Number Gratis : Click Here 
    Download IDM 6.04 + Keygen : Click Here  Download IDM 6.05 + Keygen : Click here  Password : krisna.web.id 
    Bagi yang mau IDM 6.03 Portable, bisa download disini. 
    http://krisna.web.id/software/download-idm-6-03-beta-keygen-patch-gratis/
    Selamat men-Download IDM 6.03 + Patch Gratis.
    Thanks to Krisna Prima Satya Adam

    Quran Explorer

    Quran Explorer
    http://www.quranexplorer.com/quran/http://www.quranexplorer.com/hadith/english/index.html

    Quran Explorer

    Quran Explorer

    Rabu, 10 Agustus 2011

    http://www.multi-box.net/support.php


    03-12-2009
    New updates again!
    New Chinese cocktail tool v.9.5 released - added possibily to repair IMEI problems in chinese phones in India in just a one click. New functions will be very helpfull and allow you to make your phone working in Inida very fast and without any problems. New models support added: 6120c, A5808, DORADO TV15, DSX, WGJ-ST, XL-BEETLE. New flash files also added to support area. Please go to Support files and download new software Tools, flash files.

    read more
    12-01-2009
    New updates again!
    New Flash files for chines phones added to support area. More and more POWER every day! Please go to support area and download new files.

    read more
    10-01-2009
    New updates again!
    New Alcatel Exxx tool v.1.66 released - removed bug with write language pack to U7 S210 phones, removed bug with update FW to U7 S210 phones, added support for direct unlock (via patch) Alcatel U7 S120, S210, S212. Please go to Support files and download new software Tools, flash files.

    read more
    12-11-2008
    New updates again!
    New Chinese Cocktail v.9.4 released - new chinese phones with new security support added. ZTE 195 ( new eeprom security type ) - support added. World first update for that kind of chinese phones. Please go to Support files and download new software Tools, flash files. Don't forget to update signature files!

    read more
    10-11-2008
    Hello Vodafone!
    We are happy to present to you our new update for Vodafone / Huawei phones. Now Huawei_Voda_Jtag Tool_v1.1.exe added support next model: Vodafone v710 - READ network code, read back up data ( for future updates for new versions ). Go to support area and download new software! You must update your box before use soft.

    read more
    10-10-2008
    New updates again!
    New Flash files added to support area. More than 10 new models added. Now you can use not only our own flash files - you can use also original flash files. More and more POWER every day!

    read more
    04-10-2008
    Hello Vodafone!
    We are happy to present to you our new tool for Vodafone / Huawei / Plusfon and etc.. phones. Now Huawei_Voda_Tool_v2.0.exe works via simple USB cable and support next models: Vodafone v810, Vodafone 725, Vodafone 720, VodaFone V716, VodaFone V716 v2, VodaFone V715, Huawei U120, Huawei U120e, Huawei U120s, Huawei U121, Plusfon 401i - reset network code, read user code, read back up data ( for future updates for new versions ). Go to support area and download new software! You must update your box before use soft.

    read more
    16-09-2008
    New updates again!
    New Spreadtrum Tool v.1.1 released - works faster than before, no more freezing while phone flashing, new function emplemented, smart technology for adding new models added. Added support for new flash ID. Please go to Support files and download new software Tools, flash files. Don't forget to update signature files!

    read more
    16-09-2008
    New updates again!
    New Flash files in .bin original firmware for chines phones added to support area. More than 4gb of new flash files. Now you can use not only our own flash files - you can use also original flash files. More and more POWER every day! More than 4gb added again! Next week will be HOT with updates stay with us

    read more
    10-09-2008
    New updates again!
    New Flash files in .bin original firmware for chines phones added to support area. More than 5gb of new flash files. Now you can use not only our own flash files - you can use also original flash files. More and more POWER every day! More than 5gb added again! Next week will be HOT with updates stay with us

    read more
    09-09-2008
    New updates again!
    We are happy to anounce that we finaly fix all bugs with tools. Now all tools: - works faster than before, no more freezing while phone flashing, new function emplemented, smart technology for adding new models added.

    read more
    09-09-2008
    New updates again!
    New Flash files in .bin original firmware for chines phones added to support area. More than 1gb of new flash files. Now you can use not only our own flash files - you can use also original flash files. More and more POWER every day! More than 1gb added again! Next week will be HOT with updates stay with us

    read more
    05-09-2008
    New updates again!
    New Flash files in .bin original firmware for chines phones added to support area. More than 1gb of new flash files. Now you can use not only our own flash files - you can use also original flash files. More and more POWER every day! More than 1gb added again! Next week will be HOT with updates stay with us

    read more
    03-09-2008
    Hello Vodafone!
    We are happy to present to you our first tool for Vodafone / Huawei / Plusfon and etc.. phones. First Huawei_Voda_Tool_v1.0.exe support next models: VodaFone V716, VodaFone V715, Huawei U120, Huawei U120e, Huawei U120s, Huawei U121, Plusfon 401i - reset network code, read back up data ( for future updates for new versions ). This is First update for this platform - more is comming soon. Go to support area and download new software!

    read more
    24-08-2008
    New updates again!
    New Flash files in .bin original firmware for chines phones added to support area. More than 1,7gb of new flash files. Now you can use not only our own flash files - you can use also original flash files. More and more POWER every day! More than 1gb added again! Next week will be HOT with updates stay with us

    read more

    Subscribe to e-mail:


    Go to files support area

    Read online docs - How to use

    Official Multi-box support forum
    http://www.imcapture.com/IMCapture_for_Yahoo_Messenger/
    Would you like to have an opportunity to keep in memory every precious moment of communicating with your relatives and friends? From this very moment the newly created program IMCapture for Yahoo! Messenger is at your service. This tool allows to keep good memories of all conversations both voice and video, so you will always be able to enjoy them again and again any time. Download a free trial version today.

    IMCapture for Yahoo! Messenger is worked out for people (especially users of Yahoo IM services) who want to record every second of being in touch with their friends and colleagues even if they are miles apart. Use the function of our program that enables other users to connect to your web-camera and communicate with several friends at the same time. Businessmen may find it especially attractive to organize business conferences without leaving their house.

    This program is designed to capture and monitor audio and video calls and save them converted as MP3, WMA or AAC files and Quicktime Movies (MOV), MPEG4, MPEG, VOB, PSP MPEG4, SWF and FLV, and to AVI (Windows version) correspondingly. Thus the owners of the IMCapture are able to take advantage of both significant business conversations and memorable family talks being recorded. Now all calls can be replayed, shared or studied at your will. What is more, this tool also makes it possible to adjust the quality of the video manually so you will be never disappointed with the quality of the video saved.

    IMCapture for Yahoo! Messenger is an irreplaceable tool for those who appreciate every moment spent with people who are dear to them. To become one of the happy IMCapture for Yahoo owners all you need is to install the program following simple instructions. Try IMCapture for Yahoo! Messenger today to discover opportunities of this program!

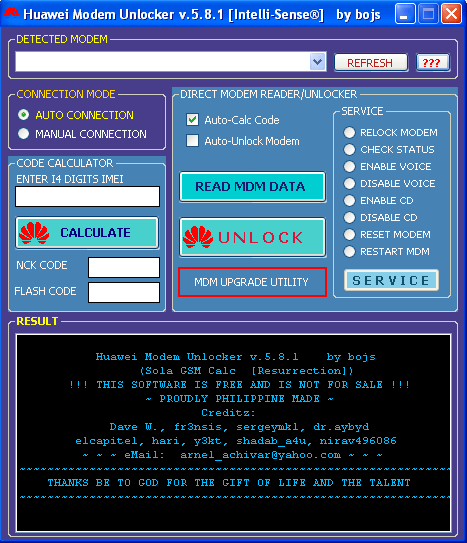
    Huawei Modem Unlocker v5.8.1 by Bojs

    Huawei Modem Unlocker v5.8.1 by Bojs
    Huawei Modem Unlocker v5.8.1 by Bojs


    http://schwantz-i.org/universal/Huaw...ckerv5.8.1.rar


    You can also visit my web

    Schwantz-i.org

    Selasa, 09 Agustus 2011

    Sensor CCD dan CMOS

    Sensor CCD dan CMOS


    Kamera Analog memerlukan film dan bukaan diafragma 1/ f detik sehingga cahaya yang ditangkap bisa diterima oleh film tersebut menjadi sebuah gambar. Pada kamera digital, film tidak diperlukan lagi seperti halnya kamera analog. Kamera digital menggunakan sensor yang dikenal dengan CCD atau CMOS.

    Pada prinsipnya, tidak ada perbedaan yang mencolok antara kamera digital dan kamera analog, karena teknologi dasar yang dikandungnya sebenarnya sederhanya saja. Sebuah kamera analog menggunakan film seluloid, mempunyai tiga elemen dasar, masing-masing adalah elemen optikal berupa berbagai ragam lensa, elemen kimia berupa film seluloidnya sendiri, dan elemen mekanik yang merupakan badan kamera itu sendiri. Elemen kimia pada kamera digital sekarang ini tergantikan menjadi elemen chips yang bisa berupa CCD (Charge Coupled Device) maupun CMOS (Complementary Metal Oxide Semiconductor) yang mengatur sensitivitas pencahayaan dan menjadi "film digital" pada kamera- kamera modern sekarang ini.

    Baik sensor chip CCD dan CMOS sebenarnya mulai berkembang secara bersamaan, kedua chip ini mengonversi cahaya menjadi elektron-elektron sehingga menjadi gambar-gambar digital. Perbedaan pokok di antara keduanya adalah CCD umumnya menghasilkan gambar berkualitas tinggi dan noise yang rendah. Sedangkan pada CMOS, noise yang dihasilkan pada gambar digital biasanya lebih banyak.

    Sensor CMOS umumnya menggunakan tenaga baterai lebih sedikit, sedangkan pada CCD karena proses khusus yang dilakukan pada saat pengambilan gambar, mengonsumsi tenaga 100 kali lebih banyak dibanding sensor CMOS sejenis. Selain itu, fabrikasi pembuatan chip CMOS lebih murah ketimbang CCD. Namun, bersamaan dengan perkembangan waktu nampaknya kedua sensor ini mulai berada pada sebuah tahapan yang setara dan bersaing sangat ketat.
    Feature and Performance Comparison
    Feature CCD CMOS
    Signal out of pixel Electron packet Voltage
    Signal out of chip Voltage (analog) Bits (digital)
    Signal out of camera Bits (digital) Bits (digital)
    Fill factor High Moderate
    Amplifier mismatch N/A Moderate
    System Noise Low Moderate to High
    System Complexity High Low
    Sensor Complexity Low High
    Camera components PCB + multiple chips + lens Chip + lens
    Relative R&D cost Depends on Application Depends on Application
    Relative system cost Depends on Application Depends on Application
    Performance CCD CMOS
    Responsivity Moderate Slightly better
    Dynamic Range High Moderate
    Uniformity High Low to Moderate
    Uniform Shuttering Fast, common Poor
    Uniformity High Low to Moderate
    Speed Moderate to High Higher
    Windowing Limited Extensive
    Antiblooming High to none High
    Biasing and Clocking Multiple, higher voltage Single, low-voltage

    (Table dari Dalsa.com)

    CMOS mengkonsumsi sekitar seperdelapan kekuatan sensor charge-coupled device (CCD) dengan sejumlah pixel. CCD merupakan sensor yang biasa digunakan kamera digital. Sekarang ini, sensor CMOS memproses proton sinar dan merubahnya menjadi sinyal listrik. Sensor ini memiliki ukuran maksimal 6.3 juta pixel.

    Pilih yang mana

    Sensor CCD dan CMOS adalah dua teknologi yang bebeda untuk penangkapan gambar digital. Keduanya saling bersaing untuk menghasilkan kesempurnaan, CCD dan CMOS masing-masing memiliki kekuatan dan kelemahan yang disesuaikan dengan aplikasi yang berbeda. Meskipun demikian, vendor yang menjual suatu teknologi selalu menonjolkan kelebihannya dibanding yang lainnya. Pilihan tergantung dengan aplikasi yang akan digunakan.
    THANKS TO.....
    Kamera-Digital.com
    SALAM

    Robotix My hobby projects Thursday, 21 Nove...